Structures
Most of the types you’ve used so far — such as Int, Double, Bool, String, Array, and Dictionary — are structures. In this chapter, you’ll learn about structures and how you can use them to declare your own types.
Custom types
Consider the following declaration:
typealias Vector = (x: Double, y: Double)Although this statement declares a new type, Vector, this type is nothing more than an alias for an existing type; it doesn’t offer any additional functionality.
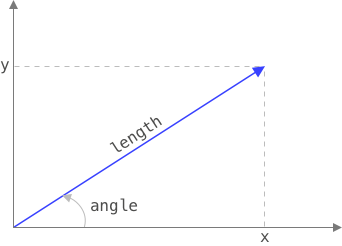
However, a vector is more than a set of x and y coordinates; it has an angle and a length; it can be normalized, scaled, rotated, and much more:

Without a custom type, you’d have to implement this functionality as functions:
func length(of v: Vector) -> Double {
  sqrt(v.x * v.x + v.y * v.y)
}

func angle(of v: Vector) -> Double {
  atan2(v.y, v.x)
}

// ...
Fortunately, Swift lets you group this functionality into a single, coherent unit: a Vector type. Here’s how you declare such a type:
struct Vector {

  var x: Double
  var y: Double
}
This code declares a new type, Vector, that has two properties, x and y, of type Double. This minimal declaration is enough to replace the type alias shown earlier with a custom type. Later in this chapter, you’ll learn how to add additional functionality — such as length and angle — to this type.
Note
Type names use camel case, just like constants, variables, and functions. However, a type name should start with an uppercase letter. This makes them easy to recognize.
The keyword struct says that Vector is a structure, which means it behaves like the types you already know. In Enumerations, you’ll learn about a different category of types.
Instances
The previous declaration only creates a type; it does not create any vectors.
A type defines the structure and functionality of its instances. In this case, type Vector states that every vector has the properties x and y.
To create an instance, you call an initializer:
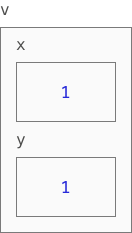
var v = Vector(x: 1, y: 1)This code creates an instance of Vector and initializes its properties to 1. It then stores the instance in variable v:

The assignment operator can also create instances:
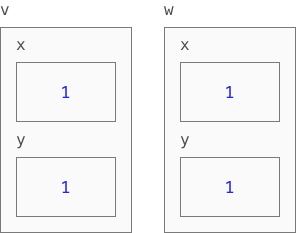
var w = vThis assignment copies the instance in v to w. You now have two instances, each with its own set of properties:

Properties
Properties define what data each instance of the type holds. You declare properties as constants or variables inside the type declaration:
struct Vector {

  var x: Double
  var y: Double
}
Swift uses these declarations to determine the amount of memory it should allocate for each instance of the type. In the following example, Swift infers the type of v as Vector and allocates enough memory to store x and y:
var v = Vector(x: 1, y: 1)Dot syntax
You use dot syntax to read or write a property. This syntax consists of an instance, followed by a dot (.) and the name of the property:
v.x
v.y = 2
You can only write to a property if both the property and the instance are variables. The second statement would be invalid if v or y were a constant.
Computed properties
Not all properties require memory. For example, you can compute a vector’s length and angle from its coordinates; there’s no need to store these values in memory.
Properties that don’t require storage are known as computed properties. Regular properties, such as x and y, are stored properties.
To declare a computed property, you declare a variable and follow it by a block that returns the computed value.
The following example adds computed properties length and angle to Vector:
struct Vector {

  var x: Double
  var y: Double

  var length: Double {
    sqrt(x * x + y * y)
  }

  var angle: Double {
    atan2(y, x)
  }
}
Note
These properties use implicit return statements. If your computation requires multiple statements, you need an explicit return statement.
You access computed properties using dot syntax:
v.length
v.angle
However, these properties are read-only; you can’t write to them:
v.length = 5If you want to allow this assignment, you can make length a read-write computed property. Here’s how you do that:
struct Vector {
  // ...

  var length: Double {
    get {
      sqrt(x * x + y * y)
    }
    set {
      let scale = newValue / length
      x *= scale
      y *= scale
    }
  }
}
This implementation specifies two blocks: a getter and a setter. The getter returns the computed value, as before. The setter executes when you assign a value to the property. You access this value as newValue. This example uses the ratio of newValue to the current value of length to scale the values of x and y. This scales the vector to the desired length.
You can now read from and write to length as if it were a stored property:
v.length
v.length = 5
Methods
Methods define the functionality of a type. You declare them as functions inside the type declaration.
The following example declares a normalized method, which returns a vector of length 1:
struct Vector {
  // ...

  func normalized() -> Vector {
    Vector(x: x / length, y: y / length)
  }
}
What makes a method different from a regular function is that you don’t call it directly. Instead, you use dot syntax to call the method on an instance of the type:
let n = v.normalized()
n.x
n.y
In the implementation of normalized, x, y, and length refer to the properties of the instance that performs the method — in this case, v.
You can use the keyword self to refer to this instance. Here’s an implementation of normalized with explicit references to self:
struct Vector {
  // ...

  func normalized() -> Vector {
    Vector(x: self.x / self.length, y: self.y / self.length)
  }
}
Although this may help you understand how methods work, unnecessary use of self adds clutter and is not recommended.
The next example declares a rotated(by:) method that returns a copy of the current vector, rotated by a given angle:
struct Vector {
  // ...

  func rotated(by angle: Double) -> Vector {
    Vector(
      x: x * cos(angle) - y * sin(angle),
      y: x * sin(angle) + y * cos(angle)
    )
  }
}
In this code, angle refers to the method’s parameter, which shadows the computed property of the same name. This is an example where self can be useful, as you must use self.angle to access the angle property while it’s shadowed:
func rotated(by angle: Double) -> Vector {
  print("Angle of the original vector: \(self.angle)")
  print("Angle of the new vector: \(self.angle + angle)")
  return Vector(
    x: x * cos(angle) - y * sin(angle),
    y: x * sin(angle) + y * cos(angle)
  )
}
Mutating methods
A method that modifies the properties of the instance that performs it (self) must be marked as mutating. Other, non-mutating methods cannot modify the instance in any way.
The following example adds normalize and rotate(by:) methods to Vector. Unlike their non-mutating counterparts, which return a new instance, these methods mutate the instance:
struct Vector {
  // ...

  mutating func normalize() {
    length = 1
  }

  mutating func rotate(by angle: Double) {
    let oldX = x
    x = x * cos(angle) - y * sin(angle)
    y = oldX * sin(angle) + y * cos(angle)
  }
}
The mutating keyword limits the operations you can perform on constants. You cannot call a mutating method on a constant, nor can you mutate any of its properties:
let unit = Vector(x: 1, y: 0)
unit.rotate(by: .pi)
unit.length = 2
Mutating an instance effectively replaces it with a different one. Mutating methods can take advantage of this and assign a new instance to self.
The following example shows an implementation of normalize and rotate(by:) that reuses normalized and rotated(by:):
struct Vector {
  // ...

  mutating func normalize() {
    self = normalized()
  }

  mutating func rotate(by angle: Double) {
    self = rotated(by: angle)
  }
}
This example also shows that methods don’t need dot syntax to call methods on the same instance. In this case, Swift adds an implicit self, so the previous code is equivalent to:
struct Vector {
  // ...

  mutating func normalize() {
    self = self.normalized()
  }

  mutating func rotate(by angle: Double) {
    self = self.rotated(by: angle)
  }
}
Of course, you do need dot syntax to access the properties and methods of a different instance:
struct Vector {
  // ...

  mutating func rotate(to v: Vector) {
    let difference = angle - v.angle
    self = v.rotated(by: difference)
  }
}
Initializers
Initializers are responsible for initializing the memory that Swift allocates for your instances. To that end, an initializer must assign a value to every stored property that doesn’t have a default value. This ensures that the instance is fully initialized and ready for use.
Automatic initializers
Structures that don’t declare any initializers automatically get a memberwise initializer. This initializer has a parameter for every stored property:
var v = Vector(x: 1, y: 1)If you provide a default value for every stored property, you also get a default initializer, which has no parameters:
struct Vector {

  var x = 0.0
  var y = 0.0
}

var v = Vector()
Additionally, the memberwise initializer uses these default values as default arguments for its parameters. This means the previous declaration of Vector gives you four ways to call its initializers:
- The memberwise initializer, with two arguments:swift
v = Vector(x: 1, y: 1) - The memberwise initializer, with an argument for
xand a default value fory:swiftv = Vector(x: 1) - The memberwise initializer, with an argument for
yand a default value forx:swiftv = Vector(y: 1) - The default initializer:swift
v = Vector()
Default values let you take full advantage of Swift’s automatic initializers. However, you should only use default values when a property always has the same initial value; avoid setting arbitrary default values.
Custom initializers
When the automatic initializers are insufficient, you can declare your own. For example:
struct Vector {

  var x: Double
  var y: Double

  init(angle: Double, length: Double) {
    x = length * cos(angle)
    y = length * sin(angle)
  }
}

var v = Vector(angle: .pi, length: 1)
As this example shows, initializers use the keyword init instead of func. They also don’t have a name because you use the name of the type to call them.
A type loses its automatic initializers when it declares its own. If you want to preserve an automatic initializer, you must declare it yourself:
struct Vector {

  var x: Double
  var y: Double

  init(x: Double, y: Double) {
    self.x = x
    self.y = y
  }

  init(angle: Double, length: Double) {
    x = length * cos(angle)
    y = length * sin(angle)
  }
}
Here, the memberwise initializer uses self to disambiguate between its parameters (x and y) and the properties of the instance being initialized (self.x and self.y).
An initializer can also use self to call a different initializer:
struct Vector {

  var x: Double
  var y: Double

  init(x: Double, y: Double) {
    self.x = x
    self.y = y
  }

  init(angle: Double, length: Double) {
    self.init(x: length * cos(angle), y: length * sin(angle))
  }
}
Here, init(angle:length:) isn’t required to initialize properties x and y because it delegates this task to init(x:y:).
Failable initializers
An initializer may not be able to create a valid instance from the arguments it receives. In this case, the initializer can return nil to indicate failure. It then becomes a failable initializer.
The following example includes a failable initializer that disallows creating a circle with a negative radius:
struct Circle {

  var center: Vector
  var radius: Double

  init?(center: Vector, radius: Double) {
    if radius < 0 {
      return nil
    }
    self.center = center
    self.radius = radius
  }
}
The question mark after init indicates that the initializer may fail and that it returns an optional. You must unwrap this optional to see if it contains an instance:
var radius = 1.0
if let circle = Circle(center: v, radius: radius) {
  // ...
}
Static members
The components you declare as part of a type — properties, methods, and initializers — are known as the members of that type. Most members describe the structure and functionality of the instances of the type. However, some members relate to the type itself. These are known as static members.
Static properties
The following example adds a static property to type Vector. This property contains a vector of length zero:
struct Vector {
  // ...

  static let zero = Vector(x: 0, y: 0)
}
The keyword static makes this a property of the type itself, not of its instances. The property must have a default value; there is no initializer for static properties.
You access a static property using dot syntax. Instead of an instance, the type precedes the dot:
Vector.zeroIf the property is an instance of the type that contains it, and Swift can infer this type, you can use the following shorthand:
let unitCircle = Circle(center: .zero, radius: 1)!Here, the compiler knows center must be a Vector, so you can shorten Vector.zero to .zero.
Note
You’ve used this shorthand before to access the static property Double.pi as .pi.
Static methods
A static method is a method you call on the type itself. You’ve used static methods before to generate random values:
Bool.random()
Int.random(in: 1...10)
The following example adds a static method to type Circle. This method returns the largest circle that fits within a given rectangle:
struct Circle {
  // ...

  static func inRectangle(
    x: Double,
    y: Double,
    width: Double,
    height: Double
  ) -> Circle {
    let center = Vector(x: x + width / 2, y: y + height / 2)
    let radius = min(width, height) / 2
    return Circle(center: center, radius: radius)!
  }
}

let fittedCircle = Circle.inRectangle(x: 0, y: 0, width: 100, height: 50)
A static method can’t access any instance properties or instance methods because you don’t invoke it on an instance of the type. Inside a static method, self refers to the type, not to an instance. Therefore, static members can only access other static members.
Up next
In this chapter, you learned how you can use structures to declare your own types. These types are no different from the types provided by Swift. For example, you can use them as parameters and return types for functions, in tuples, or even create arrays with them.
In the next chapter, you’ll learn how types change the way you program as you refactor the implementation of Tic-Tac-Toe using structures.
But first, get some practice under your belt by solving the upcoming exercises.
 Fundamentals